|
|
Post by Olga on Jan 19, 2013 1:14:58 GMT -5
I finished my new milking stanchion. I mill my own lumber so i made it out of left overs. It is all mulberry except the frame of the feeding door is made out of old 2*4s because the mulberry was going to be to heavy for the hinges. It is 3' wide, 6' long and 14" off the ground. all closed up 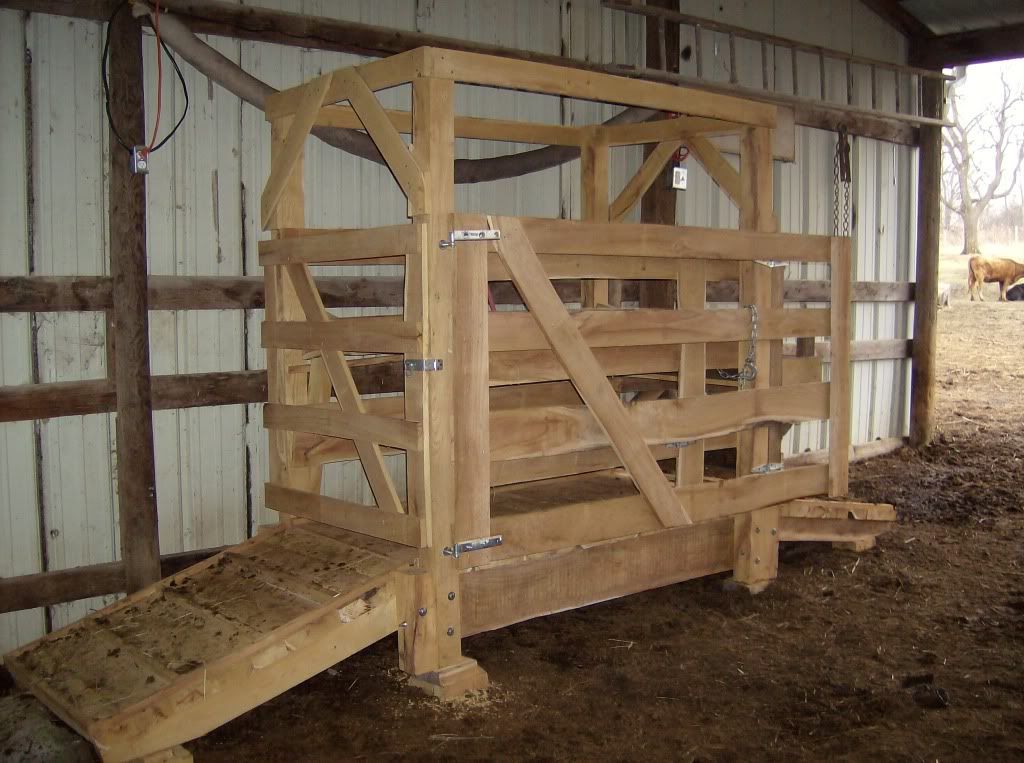 the gate on the side swings around to form a chute to run the cow in. the calf pen is in the back of the barn right behind the stanchion. the side board also swings out after the cow is in to give a bigger opening. 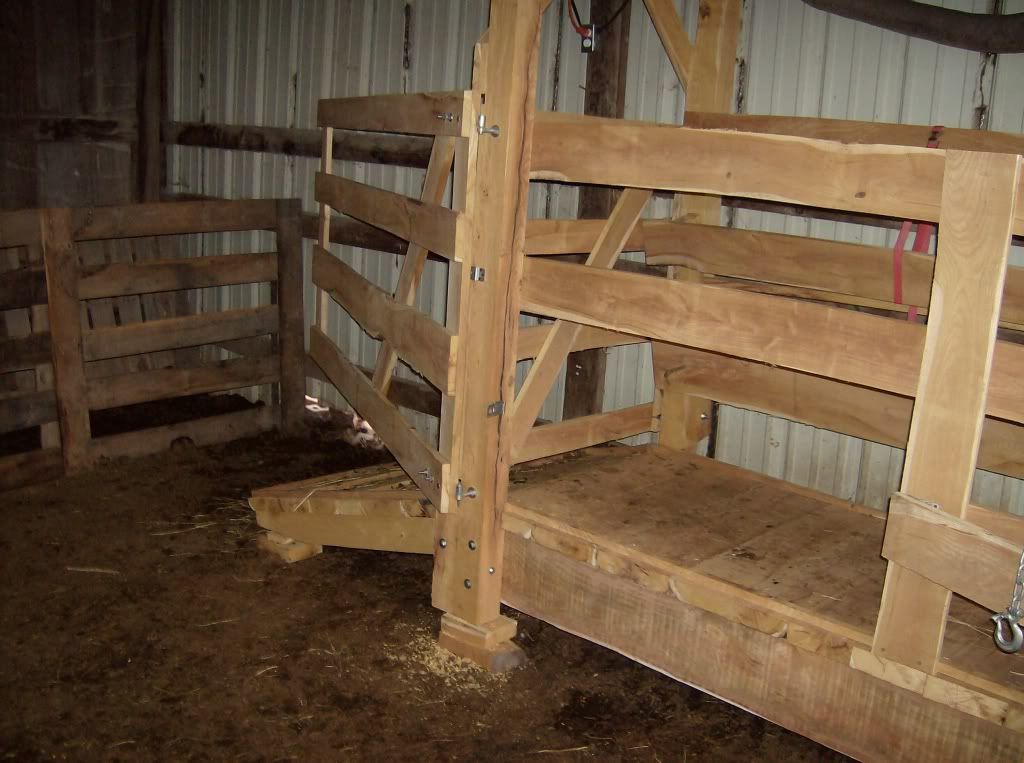 the side leans in to push the cow to the milking side . 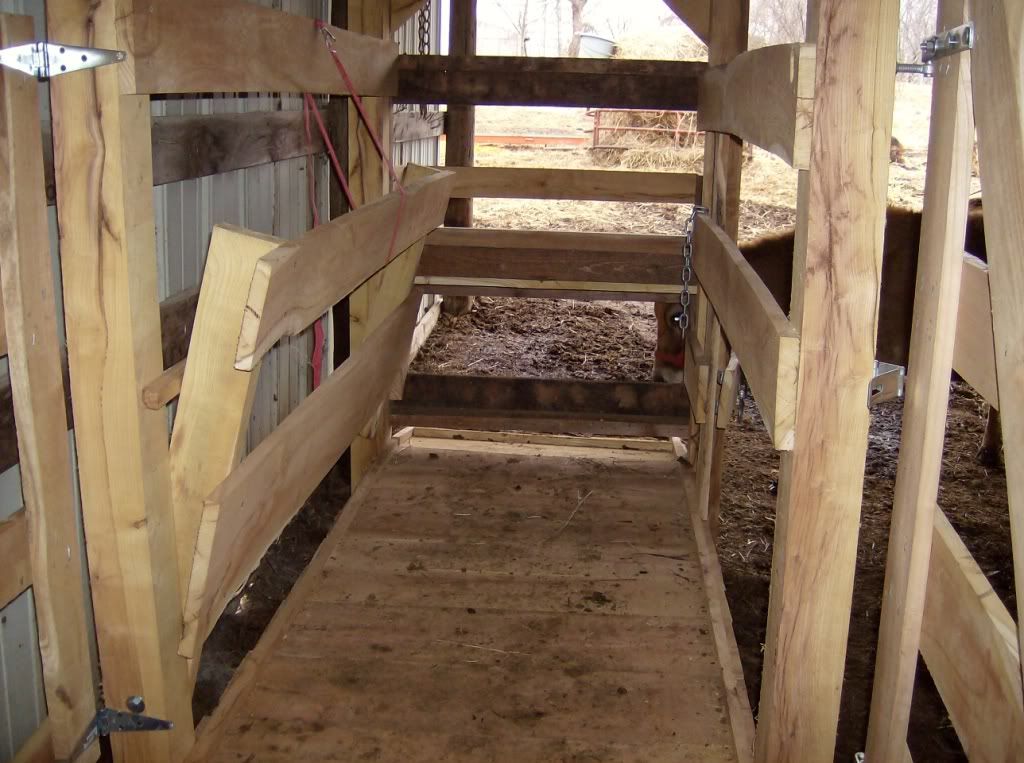 The feeder on the front gate opens up for the cow to come out when finished 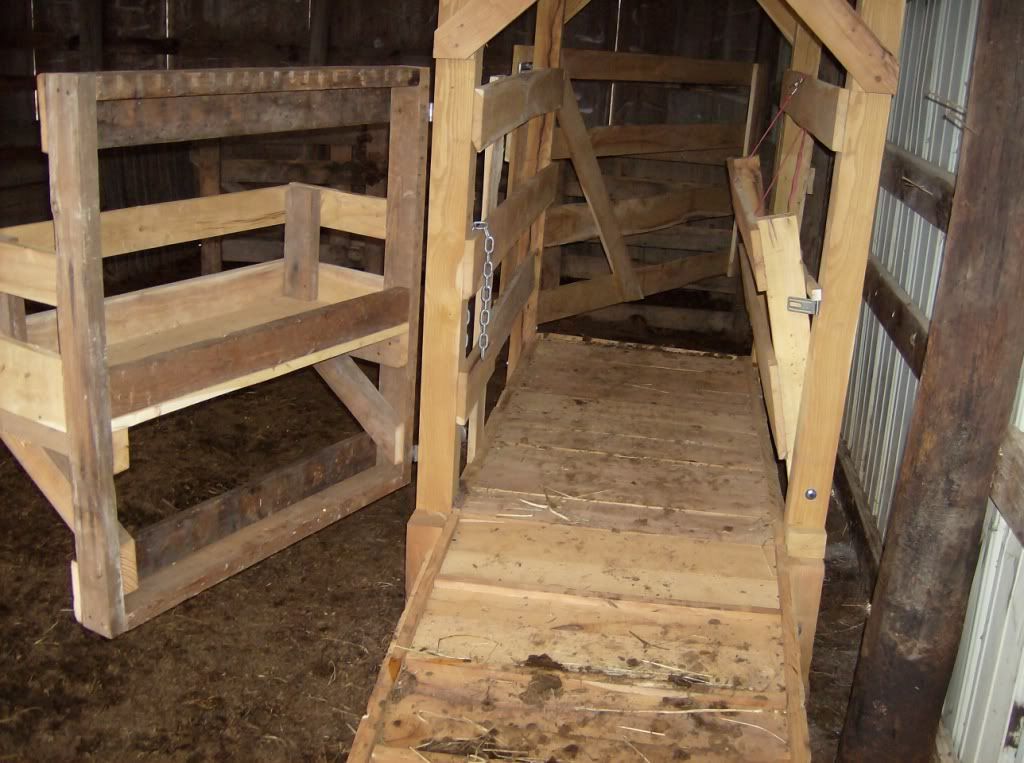 and my mid-sized jersey heifer who had to have her picture taken after laying in poo. She is due in Mid may. She is a big lap cow and has no problem going in. My dexter is not quite use to it yet but getting better. 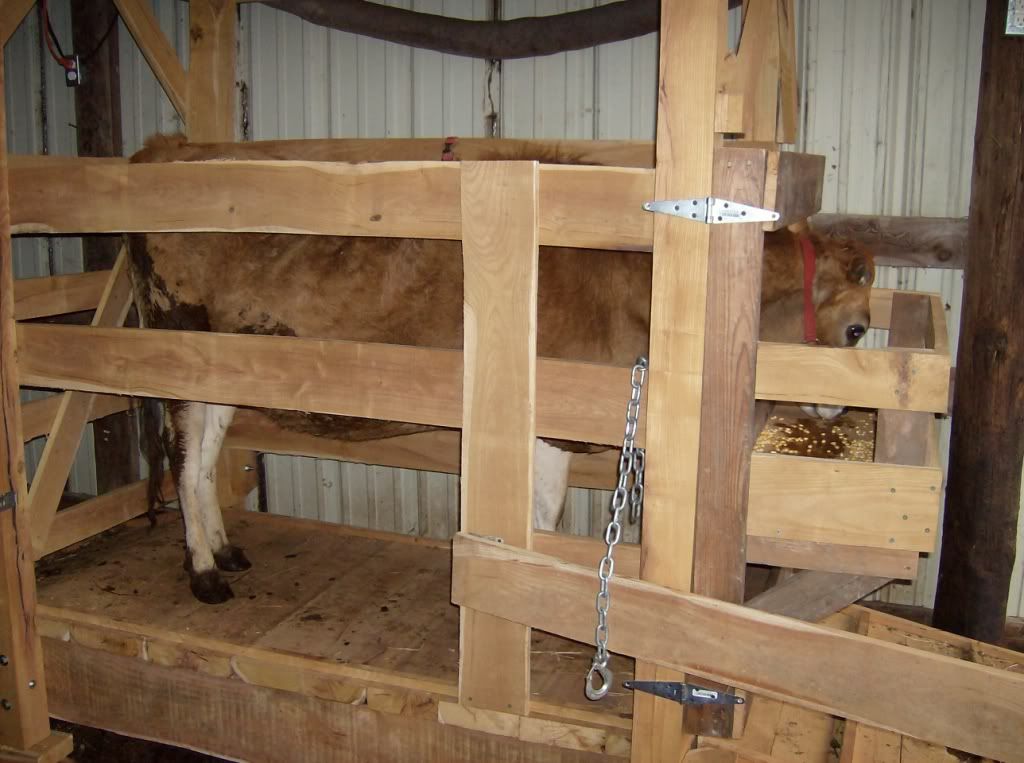 |
|
Gorignak
member
Farm Facebook page is now up. Stop by and say HI !!
Posts: 569
|
Post by Gorignak on Jan 19, 2013 10:54:45 GMT -5
THANKS for this thread, Olga. I have looked for information on quality, small herd stanchions......not a lot out there.
First question...... I am using a basic 4' X 8' "footprint for my stanchion platform. Plenty big enough for a Dexter....long or short. I WILL make it at least a 12" elevation to facilitate milking our short girls. I may go even a bit higher if suggestions here indicate that would be better.
I like Mike's design.....smooth in and out, really nice confinement for a less than ready cow. I am stuck with not having the 8' of entry room and the 8' of exit room to do a pass-thru design.
If I do what I am planning, the cow will walk up a wide ramp on one side and "enter" the stanchion. There will be a long....almost the entire side...... hinged gate to shut and confine the cow. Feed in front to get her to aim in. I like the squeezer that he incorporated.
Am I creating a difficult situation having the cow enter the wide side and make the 90 degree turn to the right to position herself at the feed box, with her head in a gate. Leaving, she would have to turn right and head down the side ramp.
I realize that it is not the perfect situation. Being a novice, I am concerned about creating a situation that feeds the cows worst fears, and makes life miserable for me.
We are able to milk our first heifer/cow with just a lead tied off on a side of a stall, so I have a little wiggle room. If the pass-thru design is just so much better, I might be able to set up a dedicated addition before our next calf in May. We will not be milking more than 2 cows a day for a couple of years.
|
|
|
|
Post by midhilldexters on Jan 19, 2013 11:11:46 GMT -5
A couple of things I always worry about with wood stanchions is when they get wet they are slippery for a cow that may be nervous in them. Cleats sometimes will help with that.
Also, what about build up of disease? Wood is hard to clean being porous. Putting your milking bucket down on the wood all the time could be an issue.
Just some thoughts, hope they help. Love that there are so many more getting into milking now.
Carol K
|
|
Gorignak
member
Farm Facebook page is now up. Stop by and say HI !!
Posts: 569
|
Post by Gorignak on Jan 19, 2013 11:20:52 GMT -5
When the school system that Judy's mom was the cafeteria head for switched to plastic cutting boards....their bacteria count went up. Seems that the wood has acids and the structure that we view as "porous" has an effect to reduce bacteria longevity.....Go Figure.
We pressure wash everything here except for the cats.....Lots of pressure washing each weekend.
|
|
|
|
Post by dexterfarm on Jan 19, 2013 11:42:08 GMT -5
I cant picture what you are talking about with the side entry. You need the open drop off on the side so you have a place to milk. If you have room at the rear for a 3 foot platform you could just have the ramp enter the rear at a 90 degree angle and then turn right before going in.
As far as the wood it is ruff cut wood. It is not that ruff but it is not planed slick like what you buy in the store. the ramps have 1 by cleats every foot. the flat platform does not have any cleats except on the sides to prevent a foot slide off. I have only had one cow fall and it was because she would get so excited to go in she would try and skip the ramp and just jump up at an angle. She was not injured but after that I would grab her halter and walker to the back forcing her to go up the ramp instead of cut across.
We do not wash it ever. It is on a dirt barn floor and water is the last thing I want in there. If they mess in the stanchion I shovel it off with a flat grain shovel after milking. I clean off the ramps some if needed but dont scrape them clean. A little dry manure keeps them from being slick.
|
|
Gorignak
member
Farm Facebook page is now up. Stop by and say HI !!
Posts: 569
|
Post by Gorignak on Jan 19, 2013 12:06:14 GMT -5
You are correct about the ramp blocking the milking spot.
I can probably steal 6' of space....3' at the front and 3' at the back for the platforms and the 90 degree angled ramps. Room is tight right now as we transition to more agriculture.
Thanks.....
Rough cut is the way to go....the rougher the better. The handiest piece of machinery on our farm is a Ditch Witch 3500....backhoe, trencher, vibratory plow. We put 3" perforated sch 40 plastic pipe in a gravel bed under everything. Drains and dries fast. I do see your point.....clean equipment, clean teats .... clean milk. I am going to opt for a once-a week pressure washing.
For pigs, we always nail cleats on any sloped surface. We use black locust cut into strips, and galvanized, ring-shank nails for durability.
|
|
|
|
Post by dexterfarm on Jan 19, 2013 12:19:11 GMT -5
One more thought If you are making a 3 * 3 platform at the front and rear. Set it about 6 " or so below your milking stanchion platform. You can reduce or eliminate the need for a ramp with that. Just make sure there is no gap between the step and the stanchion where a hoof could go through. Most cows will not have a problem with one step at all if it is not to tall.
|
|
|
|
Post by indexters on Feb 23, 2013 19:43:07 GMT -5
We are trying to get things ready for being new milkers. We have plenty of time right now, but that has a tendency to slip away. So in preparation we want to build our stanchion this summer.
My question with this design is about milking both sides. I have never done this before and will 90% certain be hand milking. A lot of designs I have seen seem to be open on both sides. This would allow me to reach one side then swap to the other side, by walking over to the other side (I hope everyone understood that). With this, I would reach all four quarters from the one side. Is that easy? Is that how most people milk? Really just know about milking from reading on here and keeping a family milk cow board.
So, real question is: Do most people here who are milking stay on one side, or do half then switch?
Thanks for any replies.
And that stanchion looks AMAZING.
Jennifer
|
|
|
|
Post by Olga on Feb 23, 2013 19:47:20 GMT -5
I think most people milk from one side. I always milk from the cow's right side, don't ask me why. My cows are used to eating while I milk, so there is urgency to get the milking done before the food runs out.
|
|
|
|
Post by indexters on Feb 24, 2013 8:05:19 GMT -5
Thank you for the reply Olga. I think I read about the two sides once and of course that is what stuck in my mind.
Speaking of running out of time, how long does it normally take an experienced milker? I know we will not be that fast at first, but I was wondering what to eventually expect.
Thanks to all on this site. It is my go to help place for my Dexters.
Jennifer
|
|
|
|
Post by indexters on Feb 24, 2013 8:31:33 GMT -5
Also, I have seen 36" wide and then 30" wide for recommendations on width. And 5 to 6 feet for length. Any comments or suggestions on either? I will only ever be milking Dexters.
Jennifer
|
|
|
|
Post by dexterfarm on Feb 24, 2013 10:23:29 GMT -5
Mine is 36" by 6' but I have the adjustable side. Without the adjustable side 36" is to wide.
|
|
|
|
Post by indexters on Feb 24, 2013 11:11:51 GMT -5
Mike - Do you find the adjustable side a nice addition? Or if you were to redo is it something you would leave out and just make it less wide?
|
|
|
|
Post by dexterfarm on Feb 24, 2013 11:36:29 GMT -5
I would do the adjustable side just like I did. I like having them in there nice and tight so they cant move around much and this lets me have it just right for each cow. Also if trying to get a cow that is not trained to go in. they will go into a bigger space easier and then I can adjust it down.
The one thing I would change is to make a much heavier head gate on it and make it a head catch not just a place to eat. It is the only thing not made out of solid mulberry. because it was going to be to heavy for the hinges i had. It is made out of old scrap 2*4. I should have used heavy gate hinges and made a solid head catch. Some day I will change that.
|
|
Gorignak
member
Farm Facebook page is now up. Stop by and say HI !!
Posts: 569
|
Post by Gorignak on Jun 5, 2013 7:54:35 GMT -5
Credit where credit is due....I would have mucked this up without "dexterfarm" Mike's design.
I had to use "green"/treated lumber for several reasons. I haven't run the sawmill in a year, and any white oak I would have cut would have been too green, and shrank too much, loosening all the joints. If you use farm lumber....IT HAS TO BE DRIED TO BELOW 15% MOISTURE TO AVOID SHRINKAGE.
I ADDED GUSSETS AND BRACING OF 3/4" PLYWOOD. Spend the money on a sheet of plywood.....NOTHING braces better, in more directions, and ensures a solid structure than 3/4" plywood.
I wanted the entire stanchion to be portable. Too heavy to lift, I had to put longitudinal runners on the bottom to allow dragging with a truck, tractor, or oxen. The stanchion is actually overkill. A wall and a simple pipe headstall from an old barn would do most of us perfectly. I try to Multi-task ALL my projects, so this one can be pulled to another barn, or temporarily roofed in a pasture for share-milking away from the barn. My fencing is rudimentary, and limited, and my pastures are not interconnected yet.
OKAY.....HERE GOES:

You can see the vacuum pipe and accumulator.....all are simple PVC pipe and fittings. The "stallcock" is at the bottom. Vacuum gauge and relief valve are visible below the accumulator. Uprights are mortised into the runners, then bolted to the cross supports. ALL cross supports are triple bolted.
YOU MUST SPEND THE $$$$ ON GALVANIZED BOLTS, LAG BOLTS, AND NAILS IF YOU USE OAK OR TREATED LUMBER. If you do not, there is a 10-15 year lifespan before they corrode severely and loosen.

BRACING is the key to years of service....DO IT RIGHT at the start. If this is dragged and bumps a rock, the strain on the frame is tremendous. I "X" braced the frame everywhere I could.

The decking was carefully fitted and bolted, then nailed. NOTHING holds the lower part together better than the decking....We doubled all the fasteners....USE GALVANIZED, the manure, urine, and acids/salts in the wood will destroy regular bolts and nails.

The "crowder" gate (as we dubbed it) is set in place to be hinged with a single bolt at the bottom of each leg. Our 36" width will accommodate a (horrors) Holstein....we will be milking non-chondro, and chondro positive Dexters. The gate (THANKS FOR THAT, MIKE) is perfect to force them to the milking side and restrict all side to side movement.


Side "crowder" complete and entry door hung

Headstall door. We routed smooth edges on the gates, and sanded thoroughly. A different design would keep a persons hands away from the horns on an uncooperative cow.
ALERT !!!!! Our non chondro, 7 year old cow went RIGHT THROUGH THE HEADSTALL the first time we put her in. WE ADDED THE REMOVABLE CENTER BAR TO PREVENT THAT FROM HAPPENING AGAIN. It is a P I T A to remove and replace...BUT IS ESSENTIAL. Talk about a camel through the "eye of the needle" That cow, near 1000 lbs just oozed right through as we stood there helpless.... No damage done. WE INSTALLED THE BAR AN HOUR LATER.

TRACTOR HITCH PINS ALLOW QUICK INSERTION AND REMOVAL ON THE HEADSTALL.

We cobbled together latches out of old U-bolts.


READY TO GO..............Pictures of it in use will be on "Part 2" of " So much to learn" ....in the Photo Gallery. It is strong enough to use to vaccinate, worm, or perform other basic tasks on a cow up to 1000 lbs.!!!
NOTE THE SAFETY CLEAT that runs down each side of the floor...so the cow's foot can't slip off the side. THANKS MIKE...I'd have broke a cow's leg learning the need for that. Stopped a hoof within 5 minutes of the cow's first use .. .!!!!
|
|